⚙️ Setup Tab
The Setup tab is the configuration and tooling workspace for AI@CDS. It is intended for:
- 4IT implementation partners responsible for deploying and configuring AI@CDS for a customer
- BI Competency Centers within customer organisations who manage the SAP analytics landscape
The Setup tab provides three collapsible panels — CDS Designer, CDS Manager, and SQL Manager — each serving a distinct purpose in the CDS development and deployment workflow.
| Panel | Purpose |
|---|---|
| CDS Designer | Generate customer-specific CDS view variants using AI |
| CDS Manager | Browse and inspect CDS view source code |
| SQL Manager | Convert CDS views to platform-specific SQL |
CDS Designer
The CDS Designer lets partners and BI Competency Centres create customer-specific CDS view variants from any existing 4IT Business Template or RapidViews CDS view. A natural language description of the required enhancement is all that is needed — the AI generates a complete, correctly annotated CDS view and saves it directly to the customer's folder on the connected file share.
Step 1 — Select the source CDS view
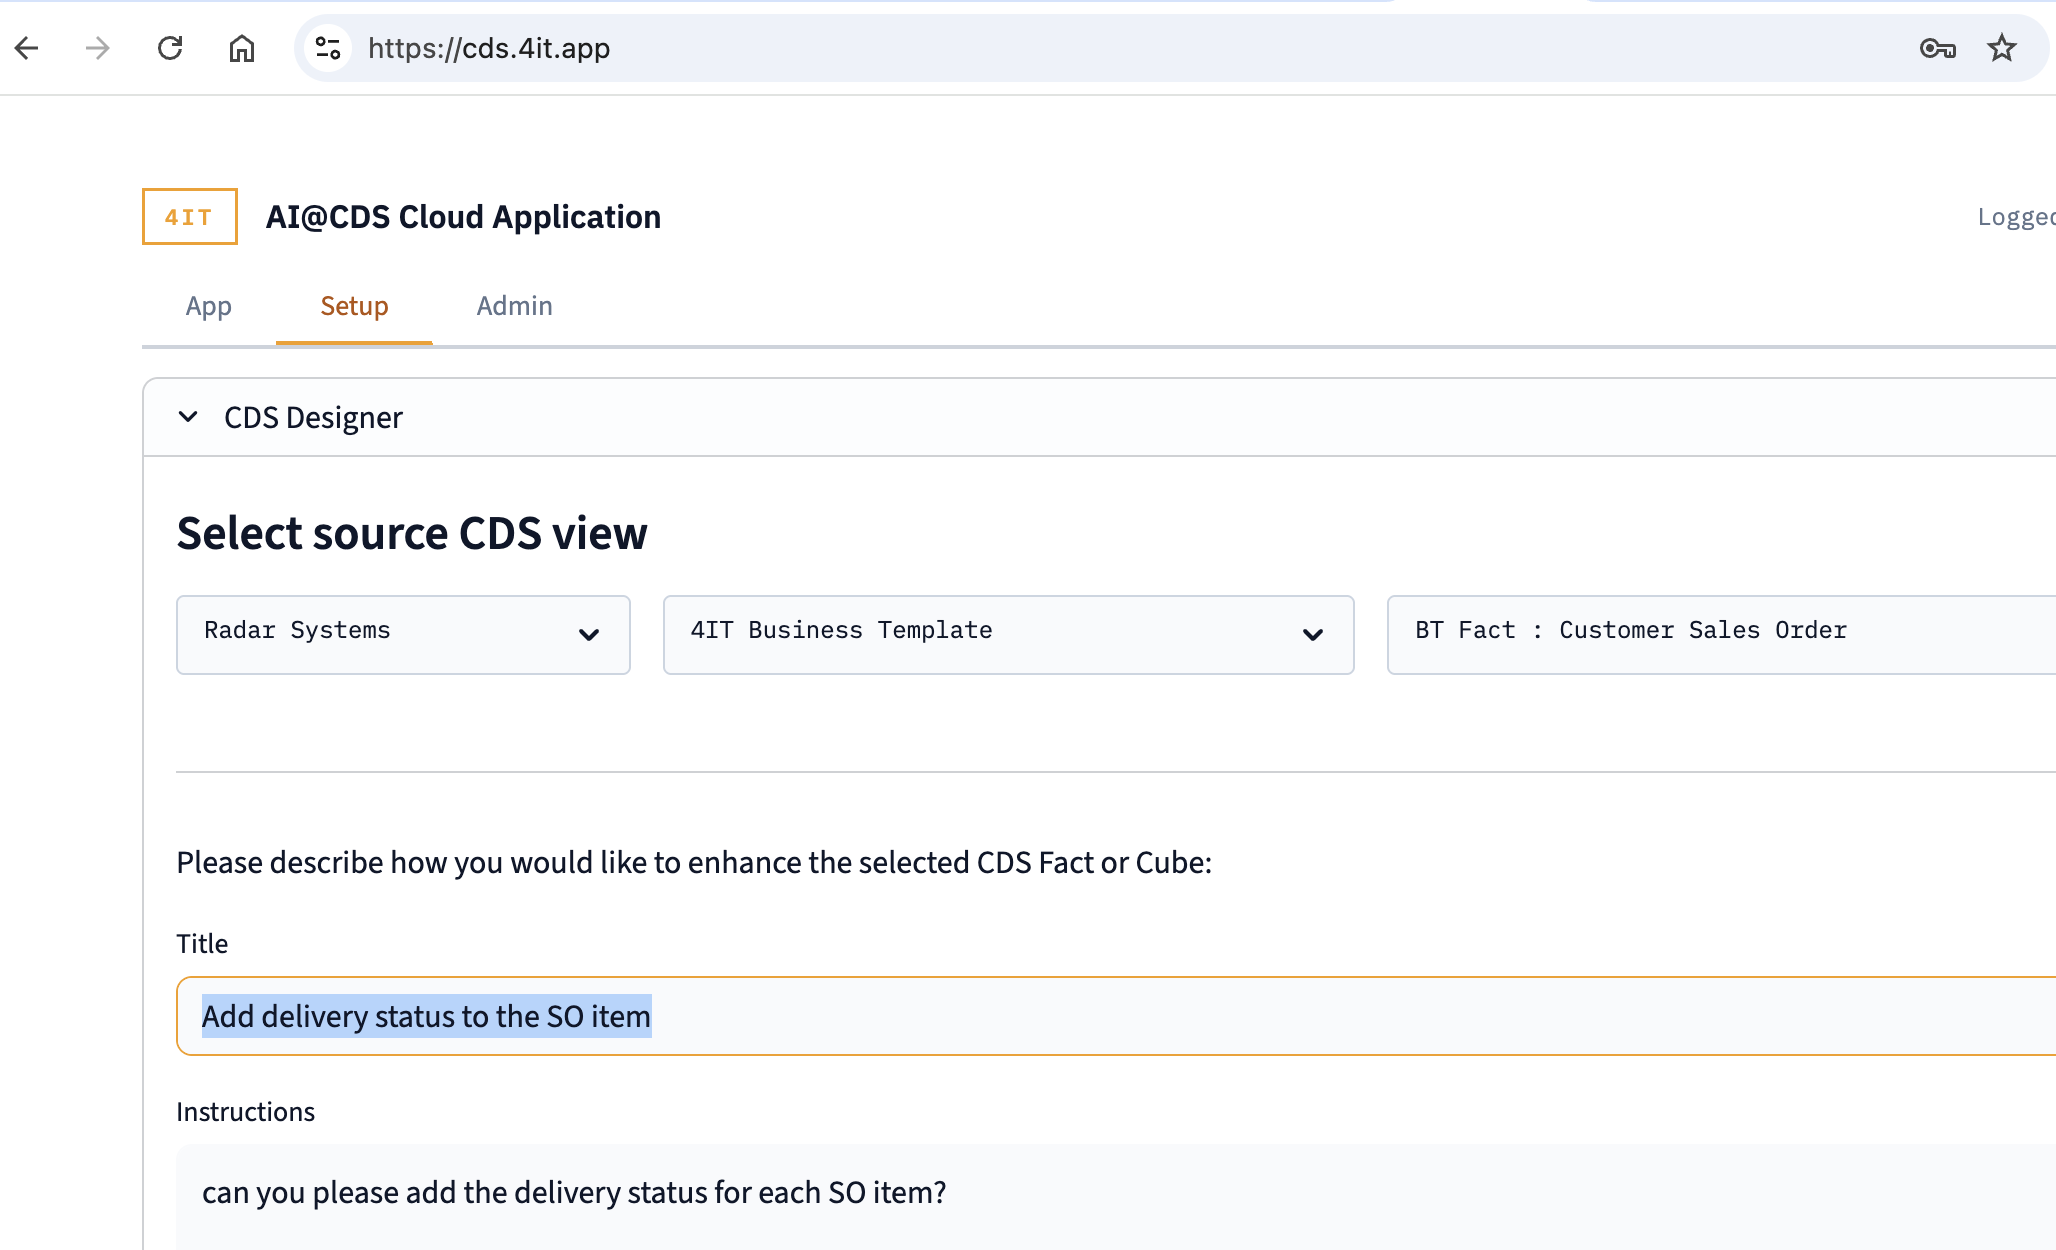
Use the three dropdown selectors to navigate to the CDS view you want to customise:
- Customer / Company — select the customer context (the generated view will be saved to that customer's folder)
- Category — select the CDS category (e.g. 4IT Business Template, RapidViews)
- View — select the specific CDS Fact or Cube to use as the source
Step 2 — Describe the enhancement
Below the view selector, enter your modification request:
- Title — a short, descriptive name for the enhancement (e.g. Add delivery status to the SO item). This title is used to label the modification markers inside the generated code.
- Instructions — a plain-language description of what you want to add, change, or remove (e.g. can you please add the delivery status for each SO item?)
Click ▶ Start the Designer to trigger the AI generation.
Step 3 — Review and save the generated CDS
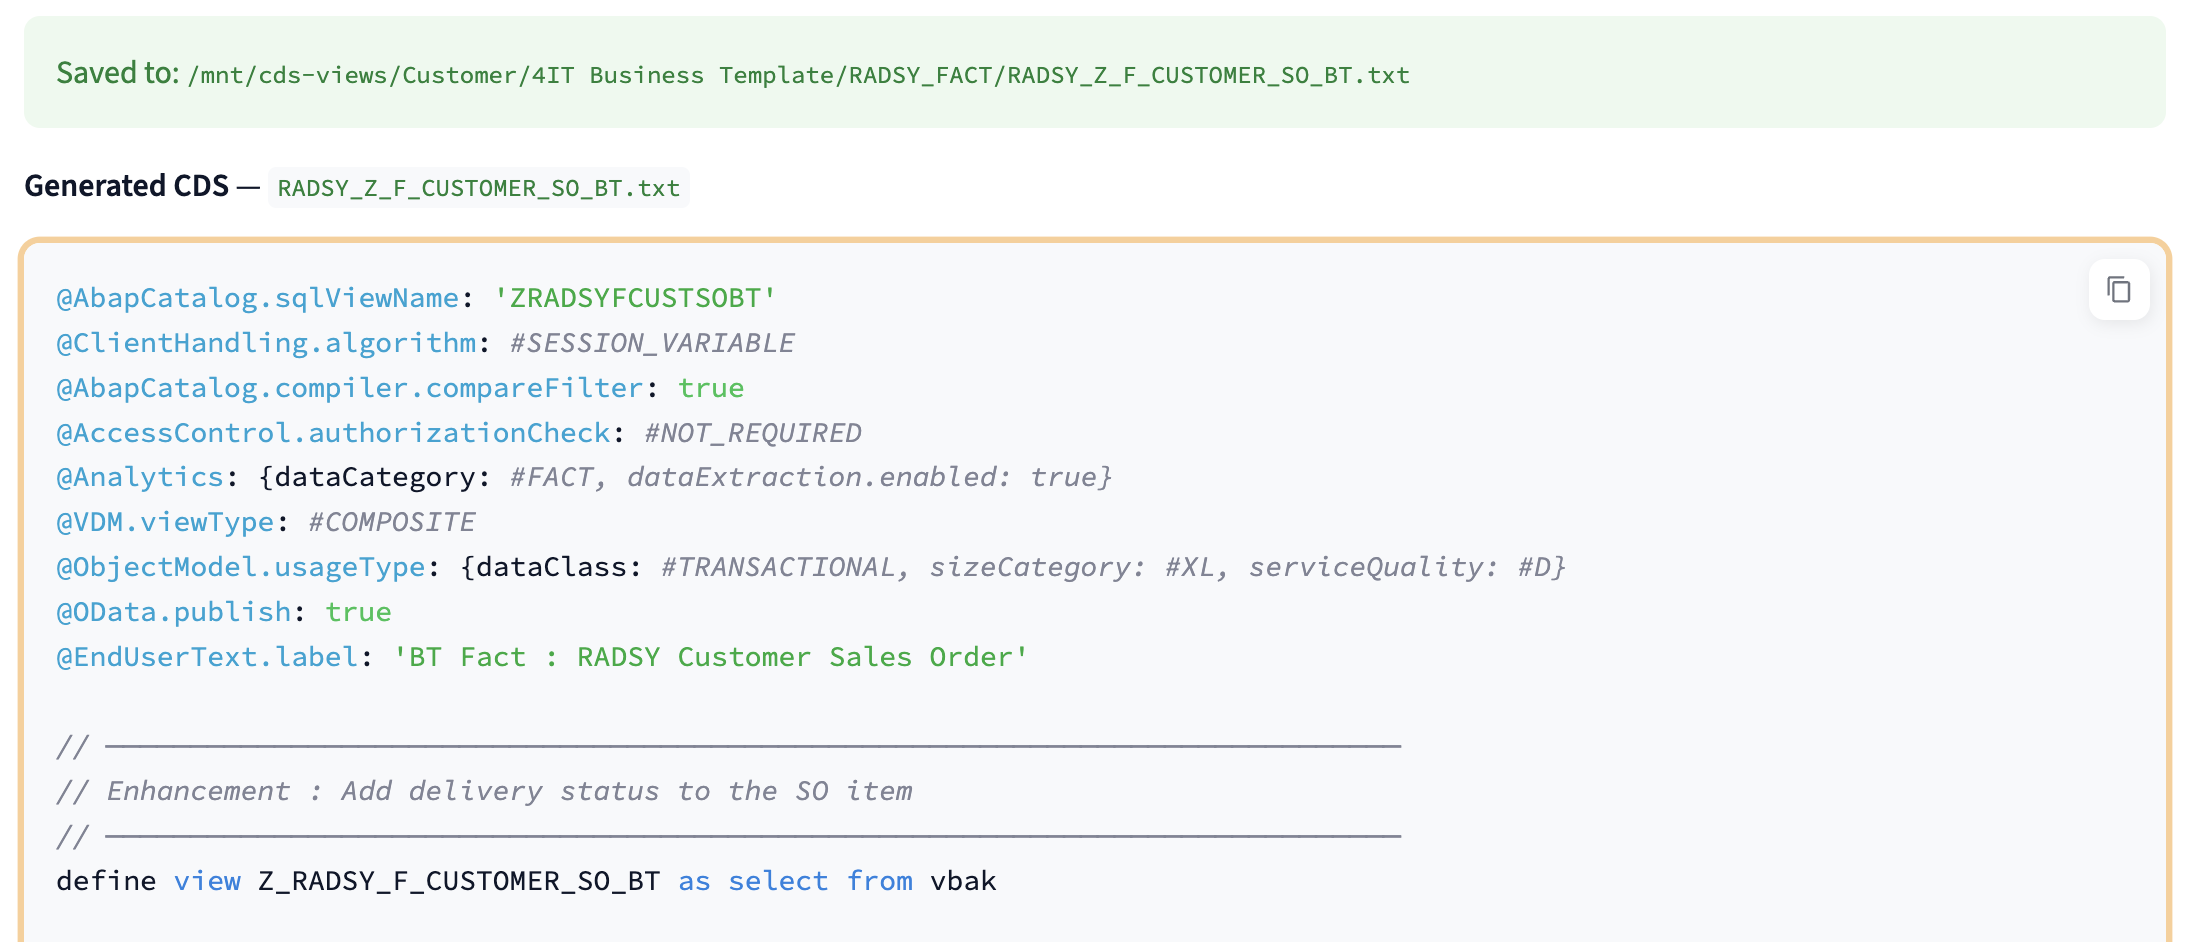
Once the AI has processed your request, the result appears below the button:
- A green confirmation banner shows the full file path where the generated view was saved on the Azure File Share
- The complete CDS source code is displayed in a syntax-highlighted editor
The generated file follows the naming convention {CustomerPrefix}_{SourceViewName}.txt and is stored under:
/mnt/cds-views/Customer/{CustomerShortName}/{Category}/Fact/
Modification markers in the generated code
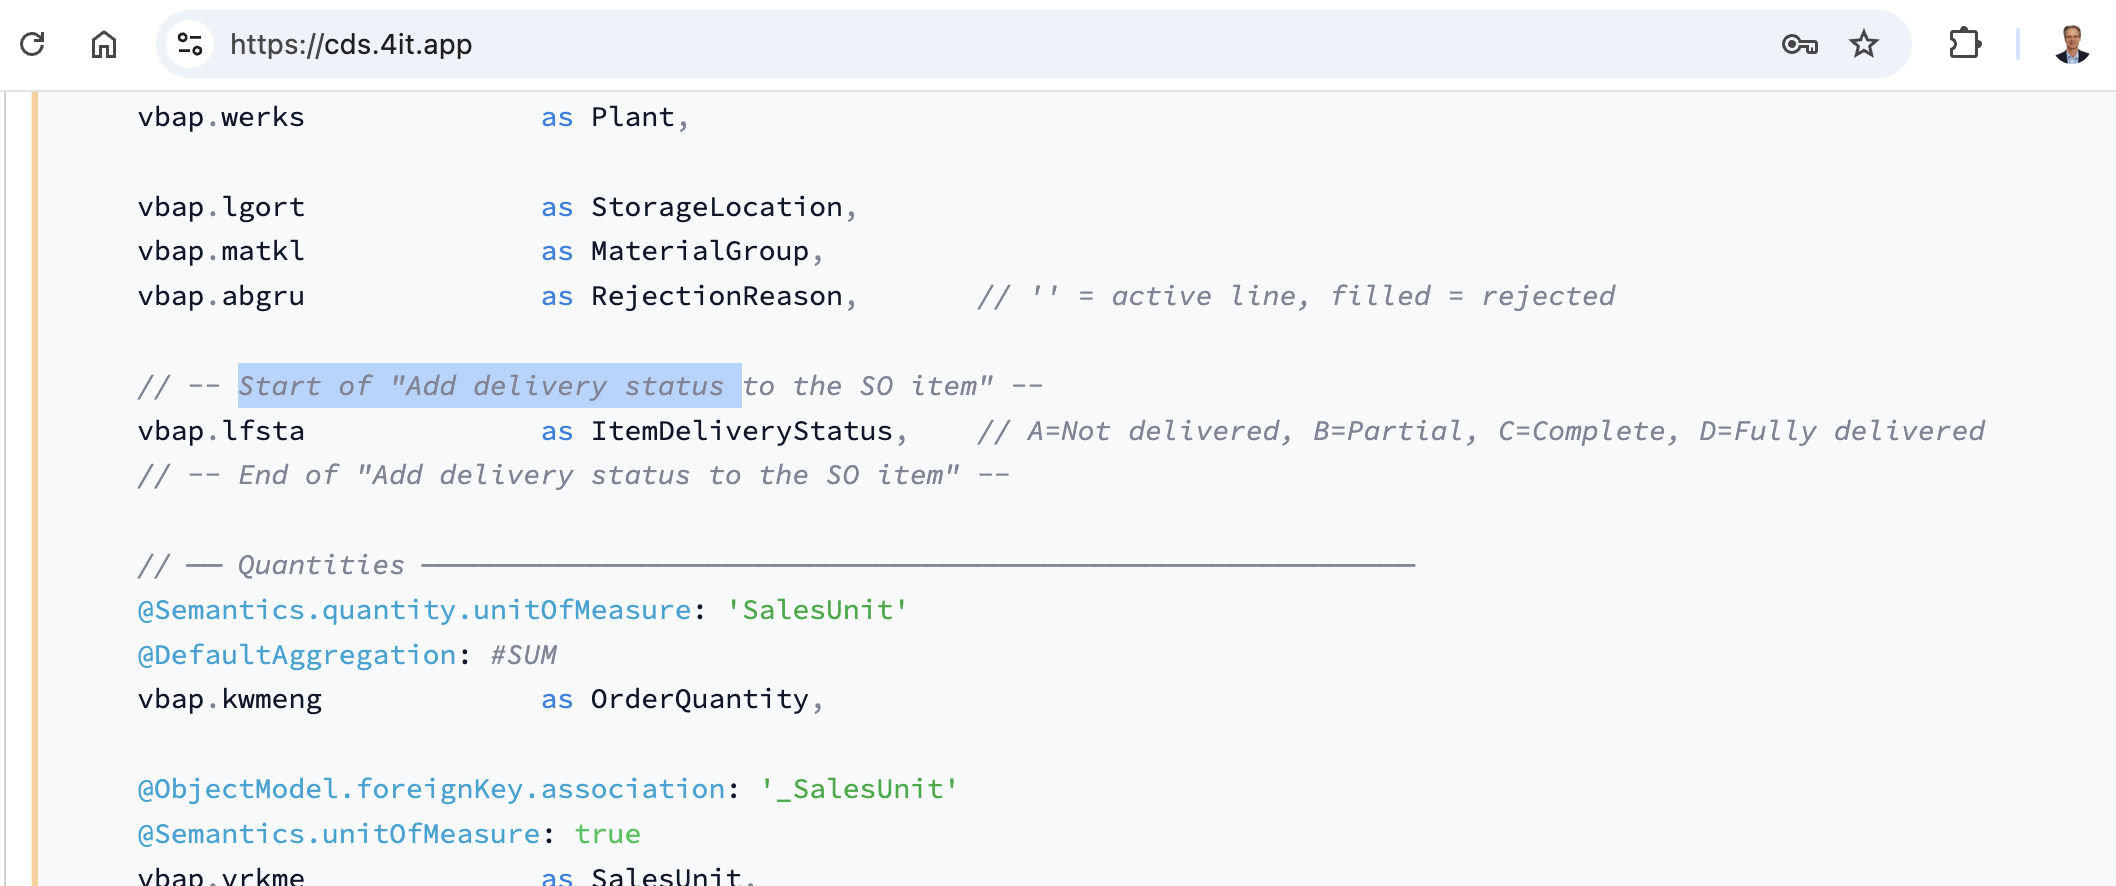
Every block of code added by the AI is wrapped with explicit start and end markers, making it easy to identify exactly what was changed from the original source view:
// -- Start of "Add delivery status to the SO item" --
vbap.lfsta    as ItemDeliveryStatus,    // A=Not delivered, B=Partial, C=Complete
// -- End of "Add delivery status to the SO item" --
This ensures complete traceability between the enhancement request and the generated output. Unchanged lines from the source view are never wrapped.
After generation, the CDS source is shown in an editable text area. You can make manual adjustments and click 💾 Save changes to overwrite the file with your edited version.
Custom views saved by the CDS Designer appear automatically in the App tab and CDS Manager dropdowns for the owning customer. Other customers cannot see them.
CDS Manager
The CDS Manager provides a searchable catalogue of all CDS views available for a given customer and category, with the ability to display the full source code of any view directly in the browser.
Browsing the catalogue
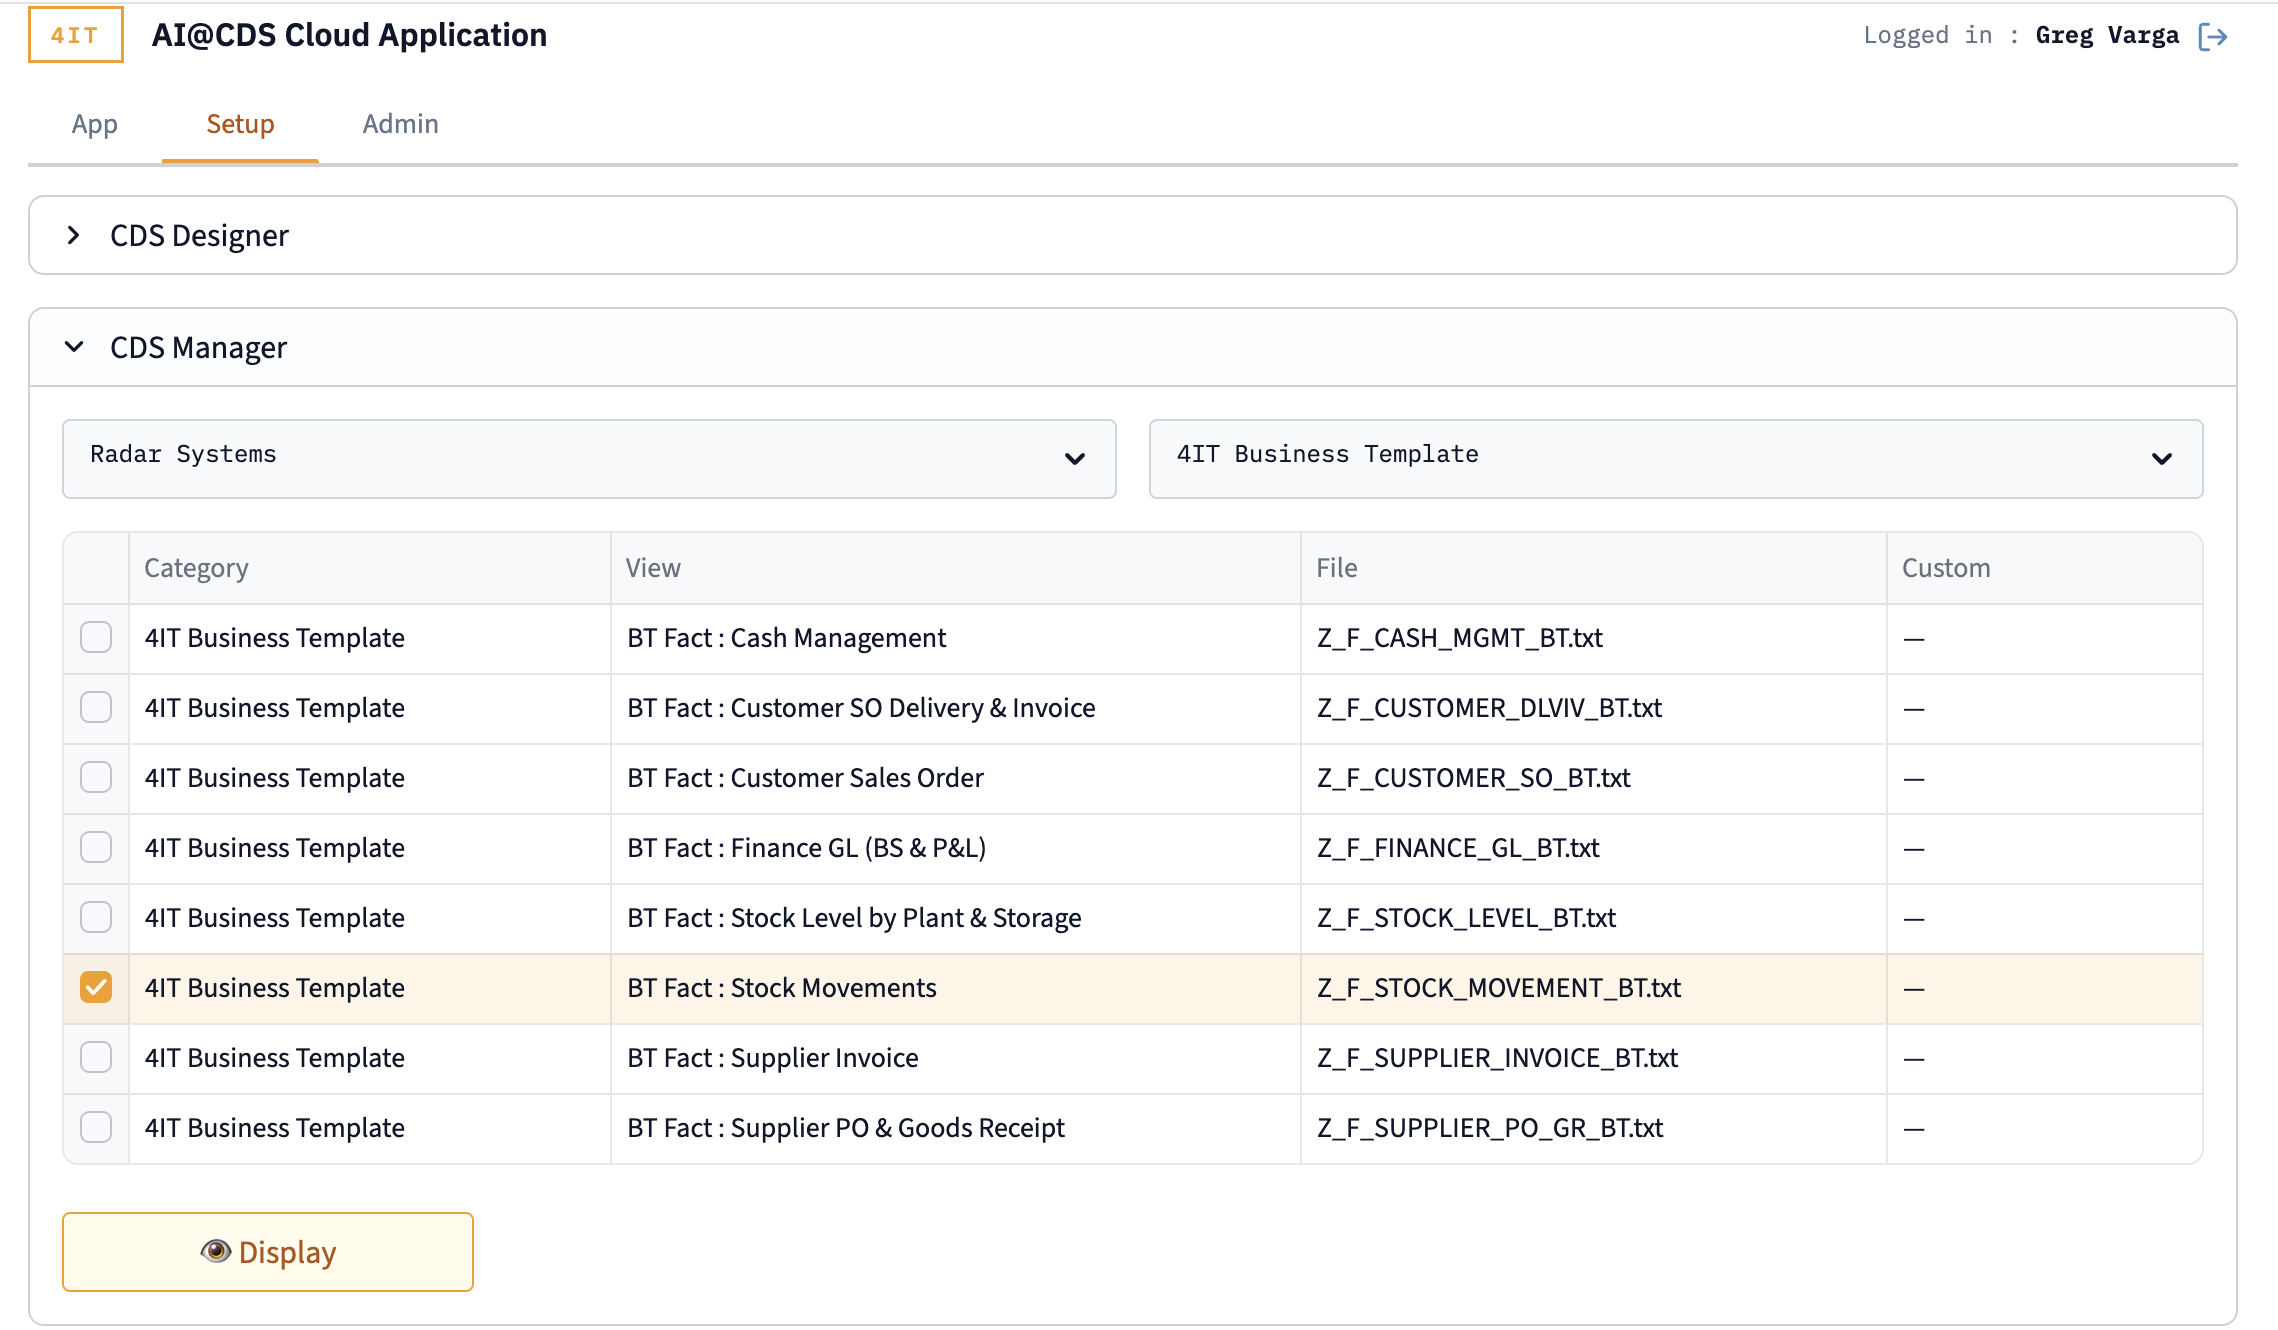
Select the customer and category using the two dropdown filters at the top. The table below lists all available CDS views with four columns:
| Column | Description |
|---|---|
| Category | The CDS category folder (e.g. 4IT Business Template) |
| View | The human-readable view label (e.g. BT Fact : Stock Movements) |
| File | The source file name on the Azure File Share (e.g. Z_F_STOCK_MOVEMENT_BT.txt) |
| Custom | Indicates whether this is a standard template (—) or a customer-specific variant created by the CDS Designer |
Select the checkbox next to one or more views and click 👁 Display to load the source code.
Displaying CDS source code
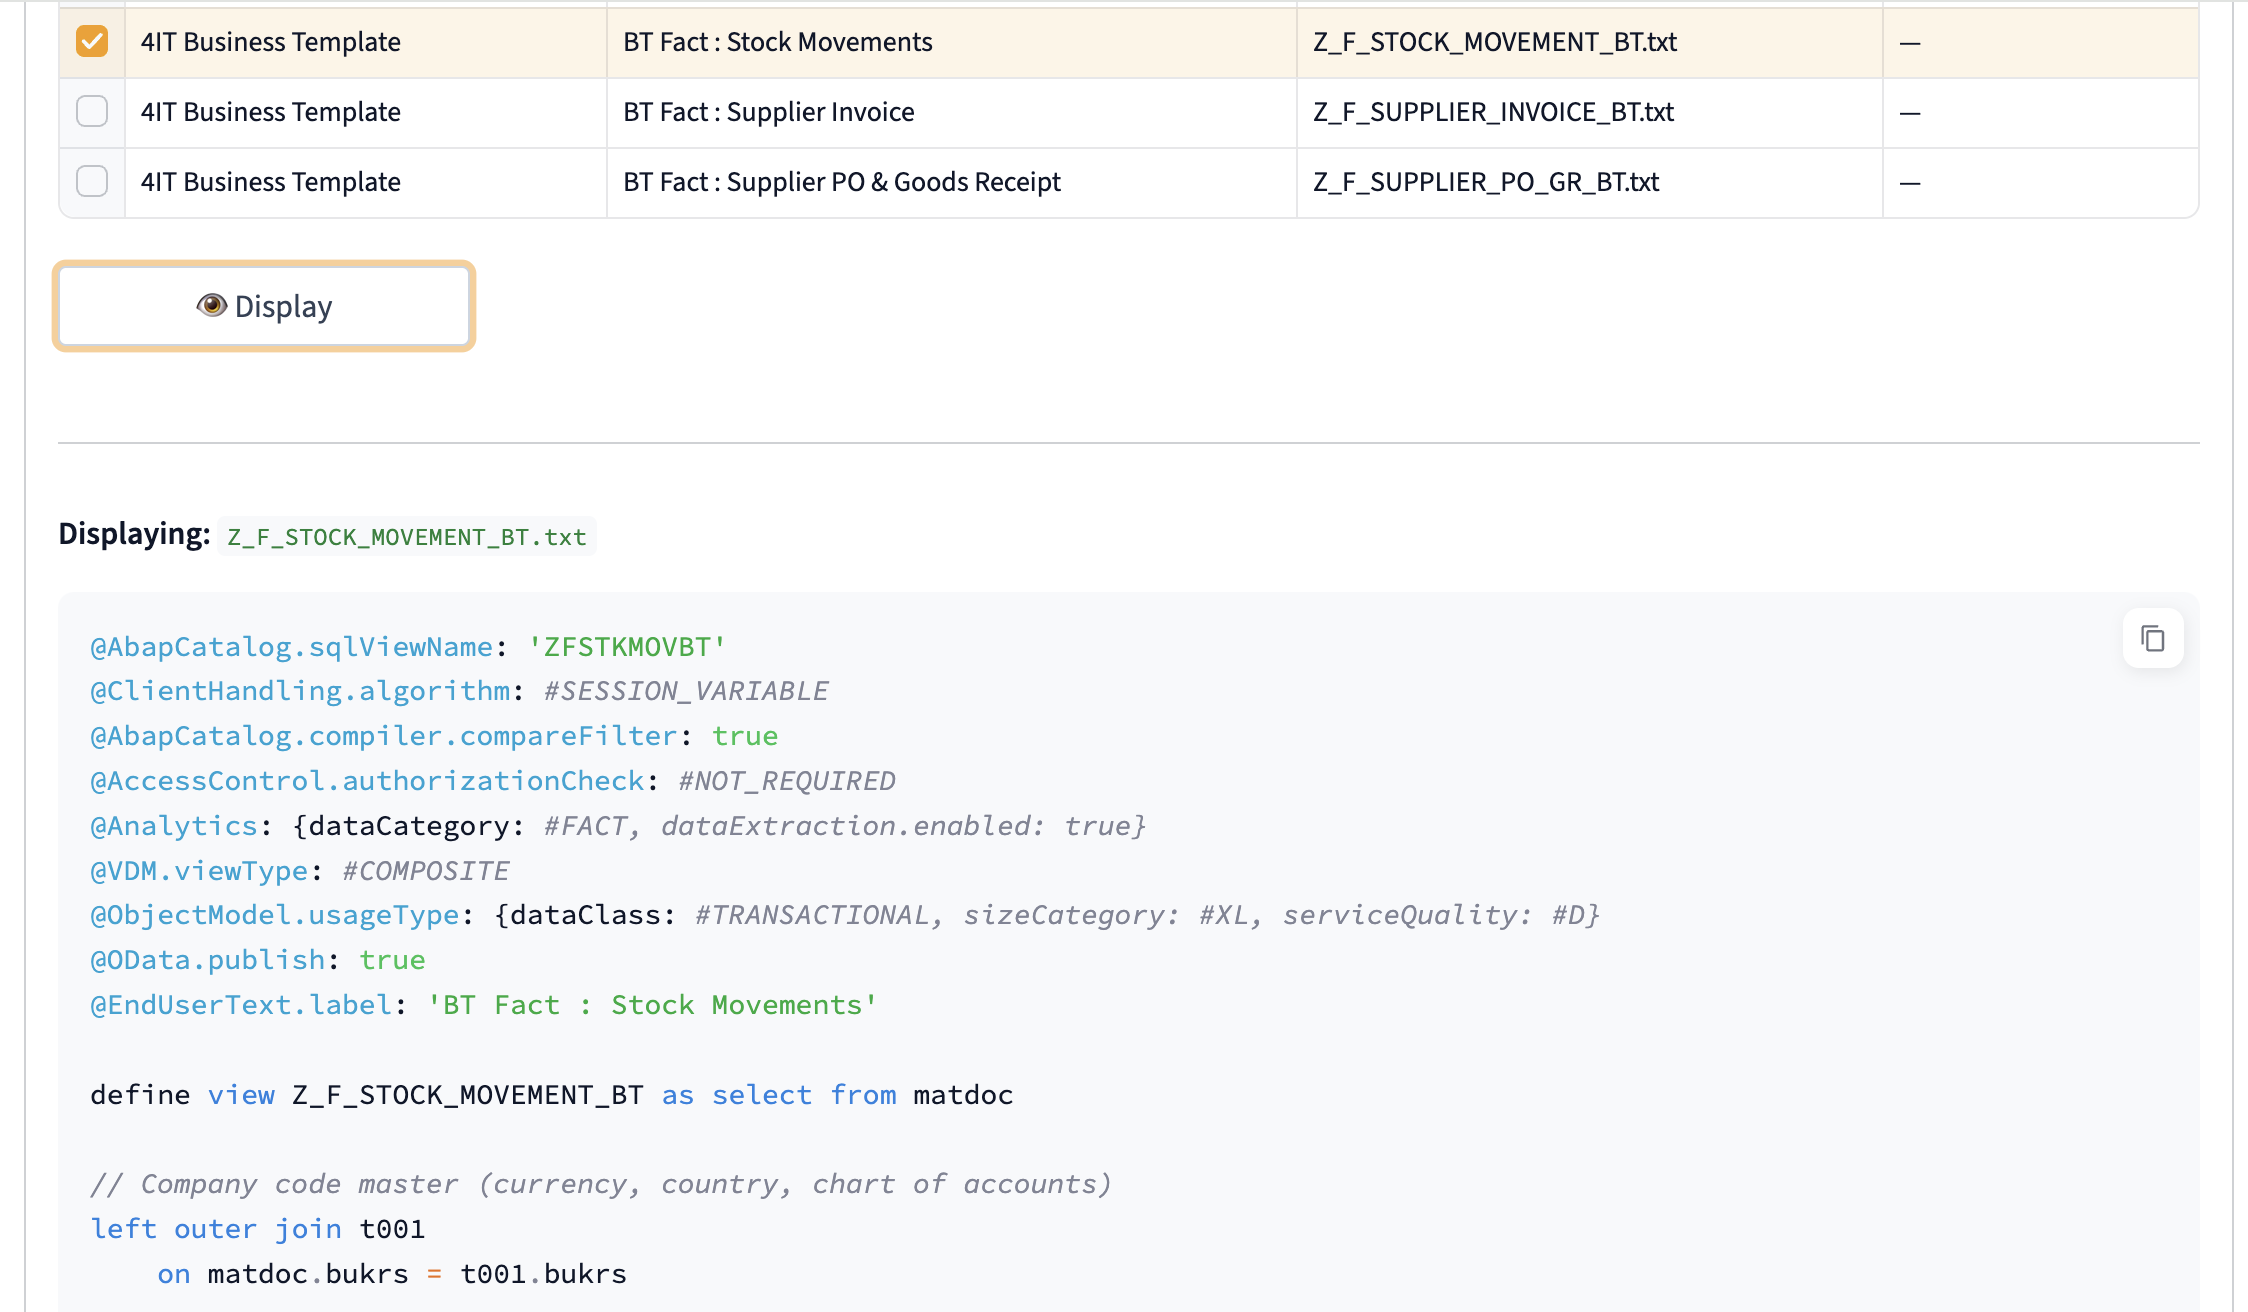
The full CDS source code is rendered below the table with syntax highlighting. A copy button in the top-right corner of the code block lets you copy the entire source to the clipboard in one click.
The display is useful for:
- Reviewing the full field list, annotations, and join structure of a Business Template
- Comparing a standard template against a customer-specific variant
- Copying the source as a starting point for manual development in SAP ADT (ABAP Development Tools)
SQL Manager
The SQL Manager converts any CDS view from ABAP Core Data Services syntax into a ready-to-execute SQL statement for your cloud data platform. The conversion is performed entirely in Python using rule-based regex transformations — no AI call is made.
Configuring the conversion
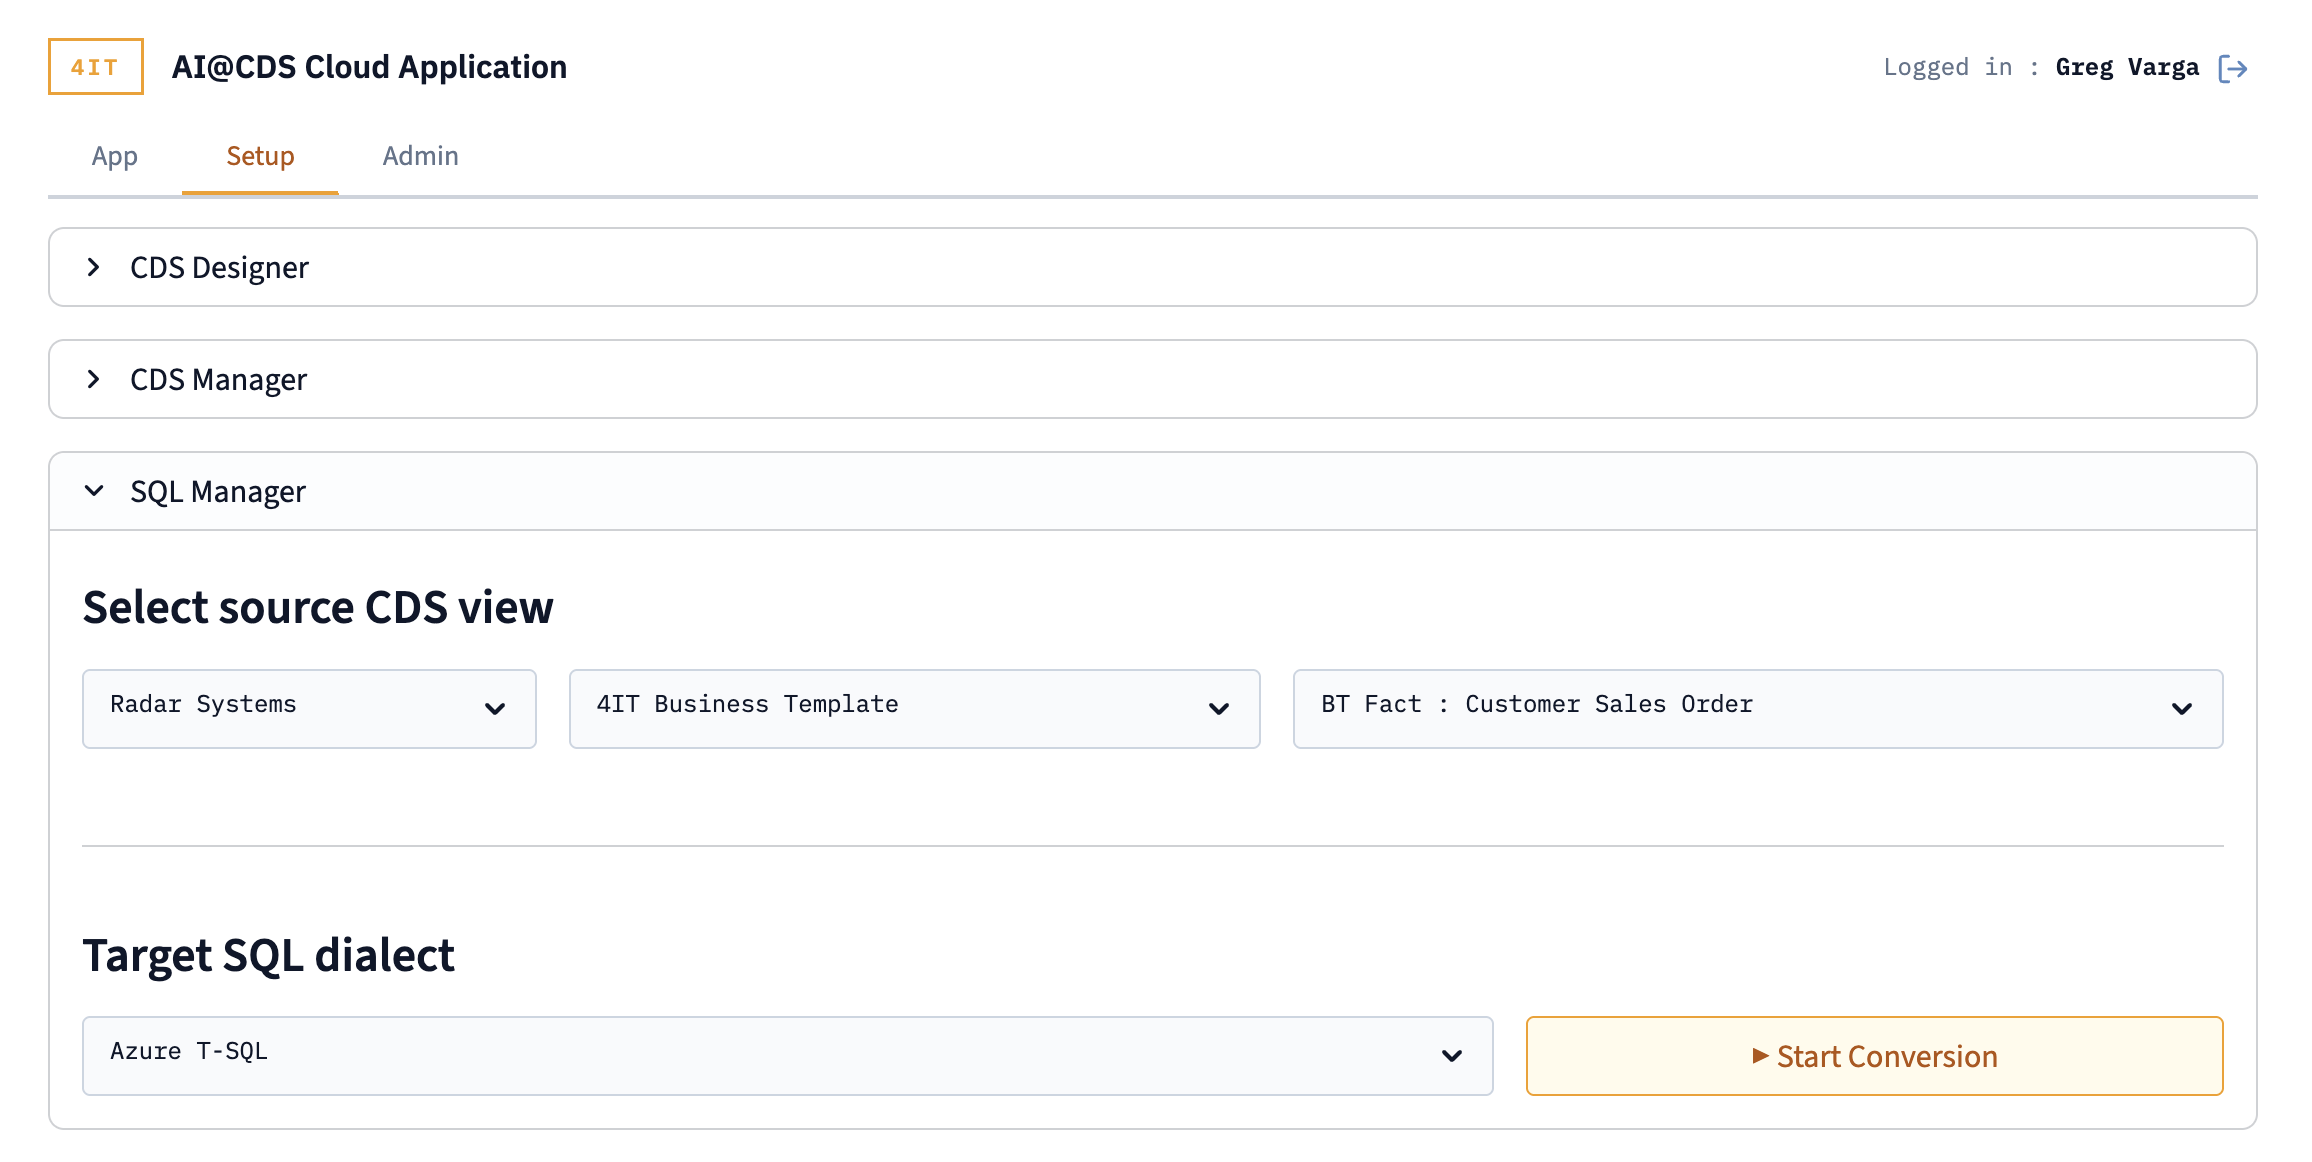
- Select source CDS view — use the three dropdowns (customer, category, view) to choose the CDS view to convert
- Target SQL dialect — choose the target platform from the dropdown:
- Azure T-SQL — Microsoft Azure Synapse Analytics / SQL Server
- BigQuery — Google BigQuery Standard SQL
- Databricks SQL — Databricks Delta Lake / Unity Catalog
- Snowflake — Snowflake SQL
Click ▶ Start Conversion to generate the SQL.
Reviewing the converted SQL
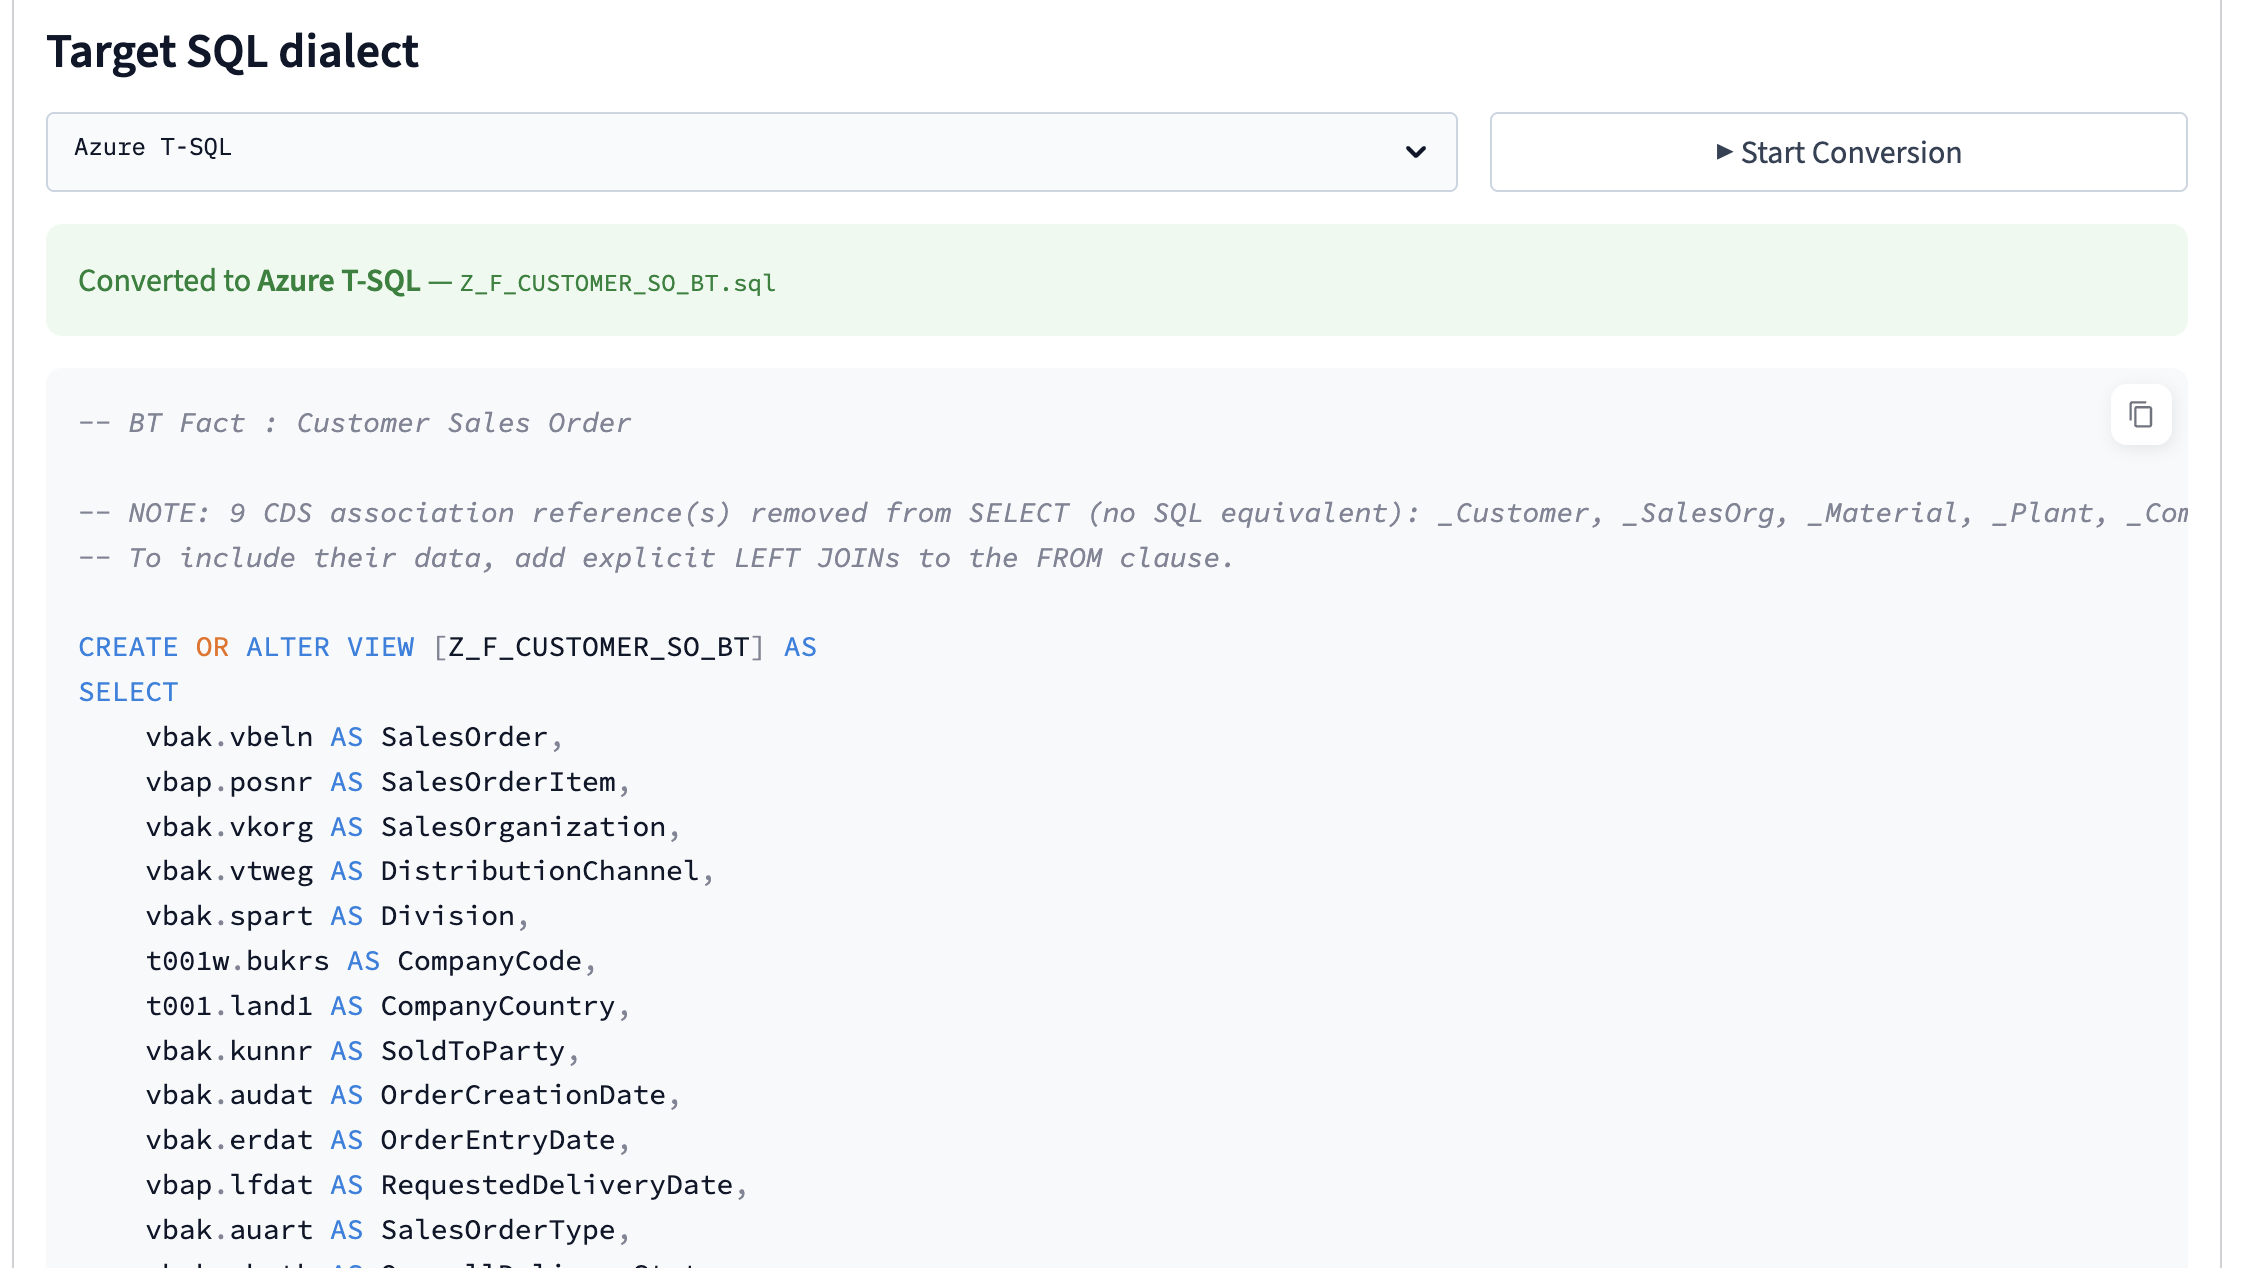
The conversion result appears below, with:
- A green confirmation banner showing the target dialect and the output file name (e.g.
Z_F_CUSTOMER_SO_BT.sql) - The complete SQL statement rendered with syntax highlighting and a copy button
The generated SQL includes:
CREATE OR REPLACE VIEWstatement (syntax varies by dialect)- All CDS fields translated with their aliases (
AS FieldName) - Joins reconstructed from the CDS
select fromandjoinclauses - ABAP data type conversions applied per dialect (e.g.
NVARCHARfor Azure,STRINGfor BigQuery) - CDS annotations stripped and replaced with standard SQL comments
CDS associations (lazy join definitions with no direct SQL equivalent) are converted to commented-out LEFT JOIN statements appended at the end of the SQL. An instructional comment explains how to activate them by uncommenting and adding the required fields to the SELECT clause:
-- The below LEFT JOIN statements are coming from the CDS associations.
-- If you would like to add any field from a left join, please uncomment it
-- and add the field reference after the SELECT statement of this SQL code.
-- LEFT JOIN Z_MD_COMPANY_BT Company ON CompanyCode = Company.CompanyCode
SQL conversion rules (data type mappings, function translations, and platform-specific syntax) are managed in the sql_conversion_rules.yaml configuration file on the server. Contact your 4IT implementation partner to add or adjust rules for your specific platform version.